This tutorial assumes that you are familiar with writing HTML, CSS and JavaScript. Additionally, some knowledge about CORS and server configuration is necessary if self-written libraries, which are not available on optiCloud shall be used.
- Dynamically load all keys from defined devices / datasources. (You don't have to define each key in the configuration)
- Setup the advanced configuration tab
- Load and use an external library
Creating a new widget and group
Adding an advanced configuration
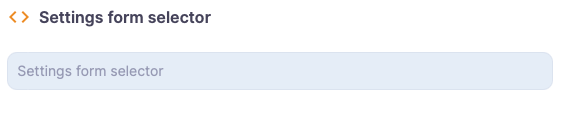
{
    "schema": {
        "type": "object",
        "title": "Tutorial",
        "required": [],
        "properties": {
            "keyBegin": {                       // The key of the setting, which is later needed to access inside code
                "title": "Beginning of key",    // The title shown above the textbox
                "type": "string",               // The type, also contains some verification (i.E. for numbers)
                "default": ""                   // A default value which is there on creation
            }
        }
    },
    "form": [ "keyBegin" ]
}
Loading selfwritten libraries
opticloud.io to your Access-Control-Allow-Origin header.Preparing the widget to be loaded by optiCloud
import() function call. This means, that the library cannot be loaded dynamically easily. The library can however be attached to window, which is globally available. In example of the gauge library, this would look like the following:// Start of gauge implementation
export class Gauge { /* ... */ }
// End of gauge implementation
window.GaugeLibrary = Gauge; // <- this line is required
const gauge = new window.GaugeLibrary(...);.Loading the library to optiCloud
self.loadLibrary = (onLoad) => {
    // JAVASCRIPT
    const script = document.createElement('script');
    script.src = GAUGE_LIBRARY_URL;
    script.type = 'module';
    script.onload = () => {
        self.ctx.Gauge = window.GaugeLibrary;
        onLoad();
    };
    document.head.appendChild(script);

    // CSS
    const CSS  = document.createElement('link');
    CSS.rel  = "stylesheet";
    CSS.href = GAUGE_CSS_URL;
    document.head.appendChild(CSS);
};
This loads the widget from GAUGE_LIBRARY_URL, adds it to self.ctx and finally calls the passed callback onLoad. Saving the implementation to self.ctx is optional, however makes the code more readable. onLoad is required. We can only begin to build the widget when the library is actually loaded. Otherwise, the gauge would not be defined yet and an error would be thrown.
Finally, the CSS is loaded and appended to the document as a link in the head, like a normal CSS would.
Loading the library can now be added to the onInit method.
self.onInit = () => {
    self.loadLibrary(() => {/* continue further work here */});
};
Dynamically subscribe to keys
Read advanced settings
self.ctx.settings. The setting of interest is available under the property's object name defined, which in our case is keyBegin.Read all keys of all defined devices
keyBegin defined string. To receive all keys of all configured datasources, we make use of the telemetryService's getTelemetryKeys(datasource) method.self.ctx.datasources.forEach(datasource => {
self.ctx.telemetryService.getTelemetryKeys([datasource.entity.id])
.subscribe((keys) => /* do work */)
});
Filtering and processing the keys
filter to only allow keys which start with keyBegin:keys = keys.filter(k => k.startsWith(self.ctx.settings.keyBegin));
const keysProcessed = {
    type:       datasource.type,
    entityType: datasource.entity.id.entityType,
    entityId:   datasource.entity.id.id,
    dataKeys:   [].concat(keys.map(k => ({ "name": k , "type": "timeseries" })))
    // "name": Actual key
    // "type": Type, which is usually timeseries (could also be attribute)
}
Setting up the user interface
self.addGauges(keys), which automatically sets up the gauges depending on the given keys.Subscribing to updates
// Create the subscription options. The latest data of all datasources
// is reported to the self.onDataUpdated method
const subscriptionOptions = {
    type: "LATEST",
    datasources: [keysProcessed],
    limit: 1,
    callbacks: {
        onDataUpdated: (values) => self.onDataUpdated(values)
    }
};
// Subscribe. Now, the onDataUpdated callback will be called.
const sub = self.ctx.subscriptionApi.createSubscription(subscriptionOptions, true);
Ending a subscription
self.ctx.subscriptionApi.removeSubscription(sub.id);
Putting all together
self.subscribeKeys = () => {
    self.ctx.datasources.forEach(datasource => {
        self.ctx.telemetryService.getTelemetryKeys([datasource.entity.id])
            .subscribe((keys) => {
                keys = keys.filter(k => k.startsWith(self.ctx.settings.keyBegin));
                self.addGauges(keys);
                const subscriptionOptions = {
                    type: "LATEST",
                    useDashboardTimewindow: true,
                    limit: 1,
                    datasources: [{
                        type:       datasource.type,
                        entityType: datasource.entity.id.entityType,
                        entityId:   datasource.entity.id.id,
                        dataKeys:   [].concat(keys.map(s => ({ "name": s , "type": "timeseries" })))
                    }],
                    callbacks: {
                        onDataUpdated: (values) => self.onDataUpdated(values)
                    }
                };
                self.ctx.subscriptionApi.createSubscription(subscriptionOptions, true);
        });
    });
};
self.onDataUpdated method. To activate it, we add it to the onInit method. Since we instantiate the gauges here, they need to be loaded already, meaning we need to make this call as the callback after the library has been loaded.self.onInit = () => {
self.loadLibrary(self.subscribeKeys);
};
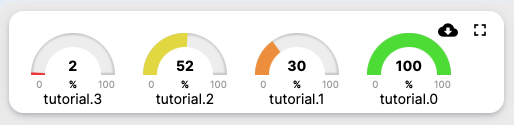
Setting up the gauges
self.onDataUpdated. Before we can do this however, we need to create our view. Since this is basic Javascript, we are not going to investigate this code deeply. First, add a container with a unique ID to the HTML section of the widget configurator.<div id="gauges-container"></div>
#gauges-container           { display: flex; }
#gauges-container > div     { margin: 1rem; }
#gauges-container > div > p { text-align: center; }
self.ctx.gauges, an object which contains a gauge for each key.self.addGauges = (keys) => {
const container = document.getElementById("gauges-container");
keys.forEach(k => {
// Create a subcontainer that contains the gauges and the respective titles
const subcontainer = document.createElement("div");
container.appendChild(subcontainer);
// Create gauge
self.ctx.gauges[k] = new self.ctx.Gauge(subcontainer);
// Create title
const gaugeTitle = document.createElement("p");
subcontainer.appendChild(gaugeTitle);
gaugeTitle.textContent = k;
});
}
self.ctx.gauges[KEY].Reacting to updates
self.onDataUpdated method. The new data is conveniently passed to the method, so we now only need to read the data and update our gauges.self.onDataUpdated = (updates) => {
updates.data.forEach(d => {
const key = d.dataKey.name;
const timestamp = d.data[0][0];
const value = d.data[0][1];
self.ctx.gauges[key].updateValue(value);
});
}
updates object contains another object data. Inside of it, we can access all relevant information we need to update our widget. dataKeycontains information about the data's key, name, device etc. Name returns the keydatacontains the actual data. If we have limit > 1, the first dimension of the array returns the respective point in data.
Conclusion
Keep in mind that it is generally a good idea to not do too much inside the optiCloud Javascript widget editor, as it has no file capabilities and can get difficult to maintain quickly.